2nd Grade Art (Period 2 Gold) Assignments
- Instructors
- Term
- 2019-2020 School Year
- Department
- Art & Music
- Description
-
2nd Grade Art is split into two groups. The Gold Group attends 4th Period Monday and 8th Period Tuesday. The Blue Group attends 8th Period Monday and 5th Period Friday.
Due to the transition to Distance Learning for the remainder of the school year, please note the following: Due Dates for projects are suggestions to help students keep on track. They are not being enforced, so as long as the work is completed as required and submitted before the end of the quarter, students will receive full credit for their work.
In addition, grading for this class will be assigned on a PASS/FAIL basis. To pass, students must complete at least 2/3rds of the assigned work. My hope is that students would want to complete all the assignments, but we realise that the inherent difficulties of Distance Learning can be a challenge in and of themselves.
If you have questions or concerns about these policies, please do not hesitate to contact me at [email protected]. Thank you!
Upcoming Assignments

No upcoming assignments.
Past Assignments
Due:
Assignment
MAPPING PT. 3
Today we are starting our THIRD WEEK of exploring what MAPPING can look like in art making. Mapping in art making can be anything from how an artist plans out their work to the process they take to make their work to what the actual finished artwork looks like. Today we are looking at TREASURE MAPS.
You will be using your IMAGINATION to create a map of your own design. The GOAL of this map is to lead us to a BURIED TREASURE!! Where could your treasure be? At the SCHOOL, in your home, at a park, in the ocean? You decide and create a FUN map that will lead us there!
1) Watch A STORY called How I Became a Pirate. It’s a fun story that eventually got turned into a play for kids: https://youtu.be/y4m_BW5yddU
2) Look at the attached examples of treasure maps. Do they look like they are following a PLAN? What SHAPES do you see? If you looked at these MAPS could you find the buried treasure? The X marks the SPOT!
3) Create your own map by following the steps below:
Select one method of aging your paper you want to use and watch the video –
- Coffee dying: https://youtu.be/c7DmtECcnIA
- Easy Coffee dying: https://youtu.be/0lMinJUM4eo (she talks a lot at the beginning, feel free to skip around to what you need. You can use a hair dryer in place of the heat gun)
- Tea dying: https://youtu.be/1UwZNTLo-Aw - to increase the texture, interest of a tea-dyed paper, you can crinkle up the paper before it goes into the tea, you can wipe a tea bag on top of the wet paper, you can let a wet tea bag drip onto the wet paper (before baking).
- Alternatively, if you do not want to tea or coffee dye your paper, you can use brown packing paper. To age the paper down appropriately will require the use of acrylic paint. You can watch the beginning of this video to see how to age the paper: https://youtu.be/jnMbGFKsj3s
I would make a couple of pieces of aged paper in case your first map doesn’t turn out the way you want. YOU WILL NEED THE HELP OF AN ADULT FOR THIS STEP!
While your paper is drying, practice drawing a Compass Rose. A compass rose is is a figure on a compass, map, nautical chart, or monument used to display the orientation of the cardinal directions and their intermediate points. Look at some of the attached examples, as well as those on the attached maps. You can see one way to make one here: https://youtu.be/CpD3x0amz94
After your paper is stained and DRY, you can tear off the edges of your paper to make the map look older and damaged. With an adult’s help, you can also burn the edges of the paper to make it look like it was pulled out of a burning fire. Keep a damp sponge nearby to put out the fire in case the paper starts to burn too fast! You can even burn a few holes in the paper (But don’t rip and burn so much that you have no paper left to draw your map!). You can watch part of the video in step D Above to see how this is done.
Watch the video tutorial on How to Draw a Map: https://youtu.be/9u1-i7y-CfA (You do not need to paint your map, so you can stop once you have reached the end of the drawing part).
- A body of water (ocean, river, lake, stream, pond)
- Geographical features (mountains, hills, trees/forests, etc.)
- Landmarks (city, house, roads, bridges, etc.)
- An X marking the site of your treasure
- A boat, sea monster or some type of aquatic life if your map includes a large area of water; a dragon, yeti, castle or some type of fantastic beast if mostly land
- A compass rose (do not let it dominate your map – if working on an 8 ½” x 11” paper, your rose should be no more than an inch or two wide)
- Use colored pencils or watercolor paint to add color to your map, if you like. Keep your colors light, so they look old and worn and do not completely cover your tea dying or coffee stains.
- Paper
- Pencil
- Crayons or Colored Pencils or Markers or Watercolors
- A Black Permanent Marker
- Tea or coffee
- A cookie sheet
- A roasting pan
- Matches and a damp sponge (optional)
Due:


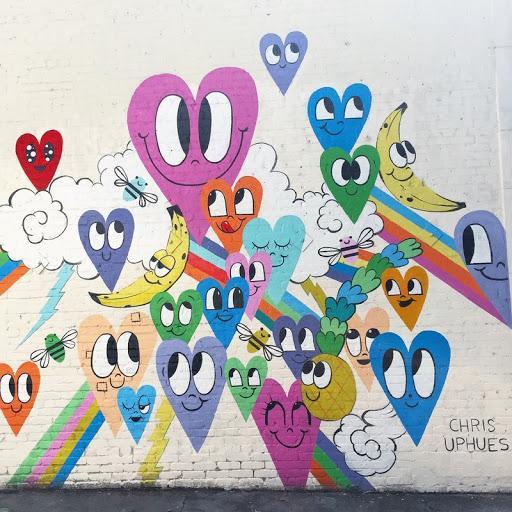
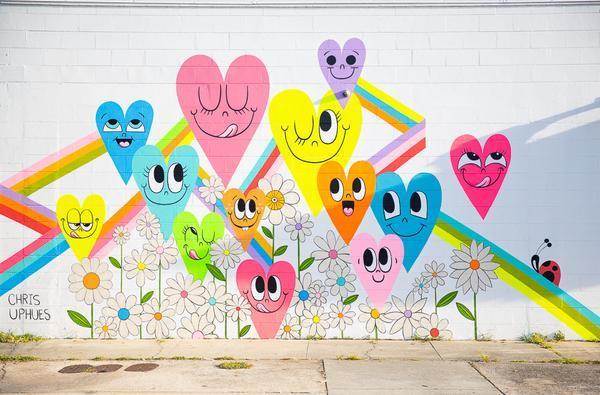
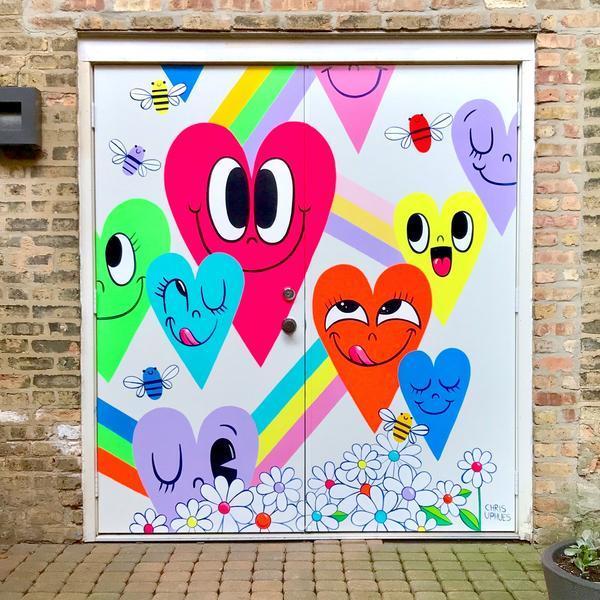
Chris Uphues-inspired Hearts
We are focusing today’s lesson on Chris Uphues-inspired hearts. (See attached examples of his work). Mother’s Day is next week! So, let’s show our moms or someone special in our lives how much we love them by making beautiful compositions inspired by Chris Uphues. Mr. Uphues is a working pop artist living in the United States. He collaborates with his wife to create colorful, playful, and fun murals and art pieces. Mr. Uphues’ aesthetic is an energetic mash-up of pop culture nostalgia and timeless optimism. You can see his work on walls (known also as graffiti) and shop fronts all over New York City, Chicago, and Los Angeles. You can see some of his artwork on his website, here: https://chrisuphues.com/pages/commissions
Pop art is artwork that challenges the traditions of fine art by including imagery from popular and mass culture, such as advertising, comic books, and mundane mass-produced cultural objects. Graffiti painting is street art: writing or drawings scribbled, scratched, or sprayed on walls or other surfaces in a public place. You can learn more about Pop Art here: https://www.tate.org.uk/kids/explore/what-is/pop-art
This year, Mother’s Day is celebrated on May 1oth. It is a day to honor mothers and motherhood.
From your supplies, you will need:
- Paper
- Crayons, colored pencils or markers
- 1 black marker
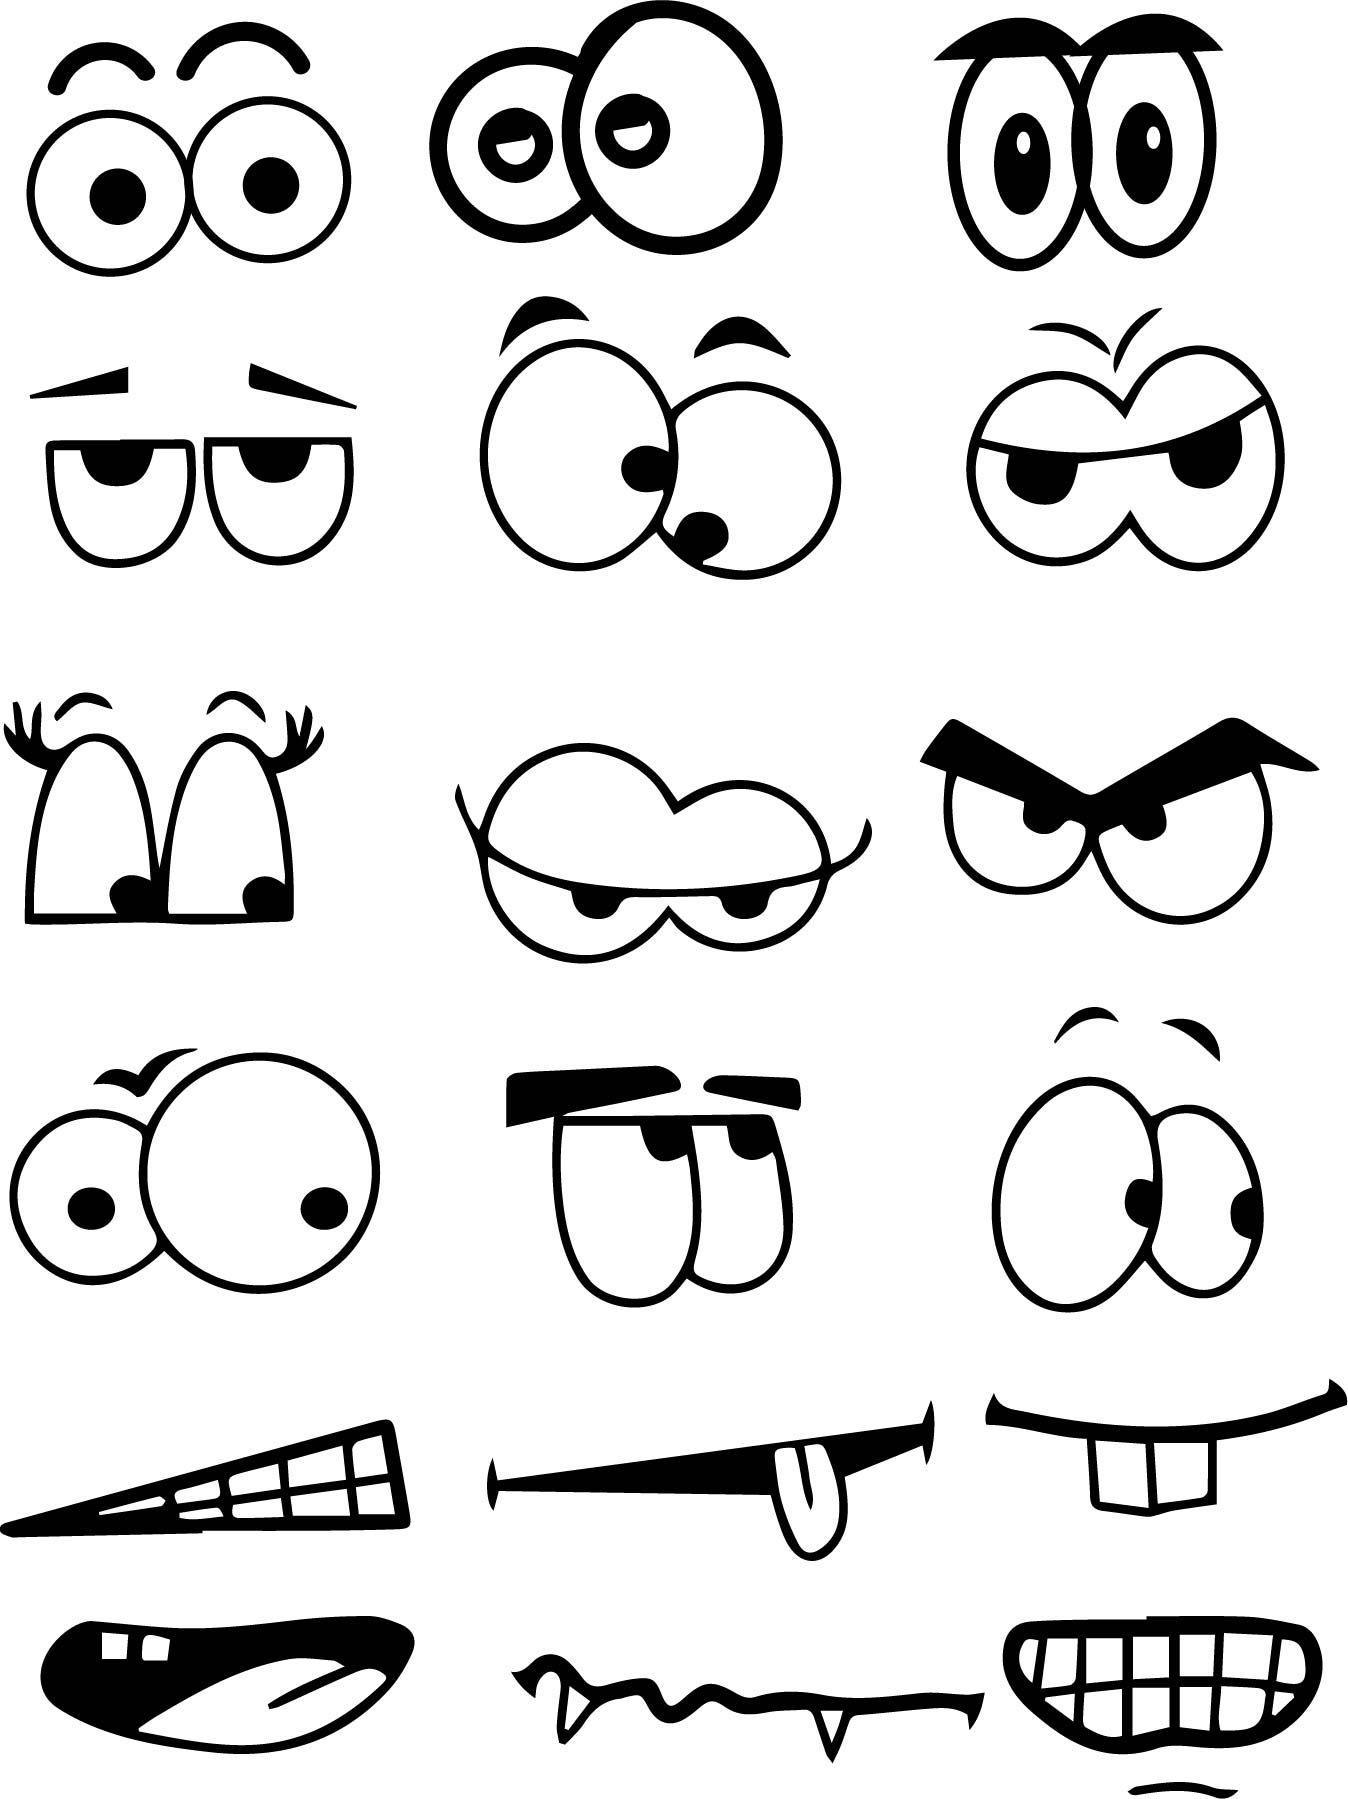
You can watch a video about how to create hearts in the style of Mr. Uphues here: https://youtu.be/B9Mkw6WFdRc. You don’t need to work on a dry erase board, but it is always a good idea to practice what you want to draw before you start on your final artwork. You can "sketch" out your plan and practice drawing hearts on a scrap piece of paper. Then, when you are comfortable with drawing hearts and your COMPOSITION, cover your drawing paper with hearts. I have attached a couple sample pages of faces, but feel free to create your own expressions! Fill in the areas around your heart with different types of line and pattern. You can even hide a special message to your mom or someone special in the artwork. What would you like to tell them? Then you can use crayons, markers or colored pencils to color you artwork. Work neatly and try to fill in the shapes without going over the lines. If you want to watch the 2nd part of the video about adding color, you can see it here: https://youtu.be/m1aqfeigbYw. She uses watercolor markers and watercolor paints, but you can just color your artwork with crayons, markers or colored pencils. Have fun, and create something special and full of love for your mom or that special someone you want to honor on Mother’s Day!
Please email me a copy of your finished artwork when it is complete at [email protected].
Due:
Make a Rainbow
What is a rainbow?
A rainbow is light that has been bent (or REFRACTED) by water molecules in the air and split into separate colors (the SPECTRUM). Do you know what the colors of the rainbow are?
Starting from the outside arc and working in, the colors are:
- Red
- Orange
- Yellow
- Green
- Blue
- Indigo
- Violet
Giving the order of the colors a name, ROY G. BIV (a MNEMONIC DEVICE) helps us remember the order they go in.
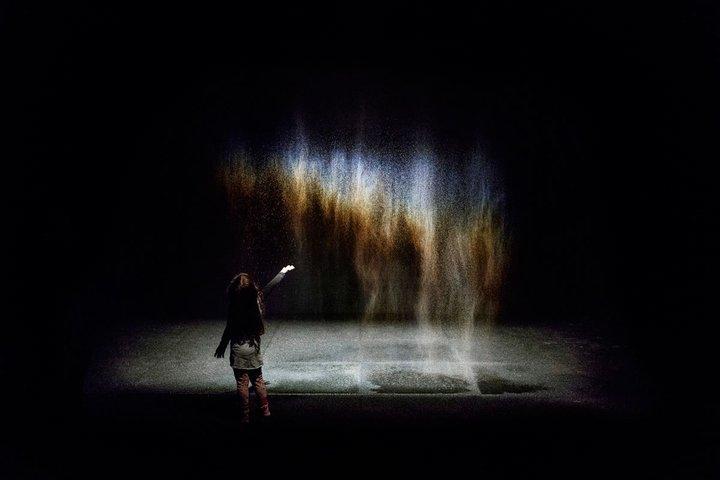
Olafur Eliasson is an Icelandic-Danish artist known for sculptures and installation art using elemental materials such as light, water, and air temperature. Eliasson creates experiences that can be shared by everyone. Some, like Beauty (attached), recreate natural phenomena such as rainbows. You can see a video of the work here: https://youtu.be/BeSlK0RvHd0 Eliasson makes spectacular installations that help us think about social and environmental issues. You can see his work here: https://olafureliasson.net/archive/artwork
What you need for this project:
- A glass of water
- White paper
- Colored pencils
- A flashlight (the one on a cell phone works, too!)
- Place the glass of water on the edge of the table so a little bit hangs off the edge. Be very careful not to knock it over.
- Shine the flashlight through the glass at the top. Adjust the angle until the light falls onto a sheet of paper set on the floor.
- Color over the light on the paper to create your own rainbow.
Top Tip: Turn off the lights to see the rainbow more clearly!
Due:
Marbled Paper
Want to make some marbled paper? We'll show you how to use shaving foam and ink or paint to create swirly patterns and prints! You can use paper to print onto, or even your hands!
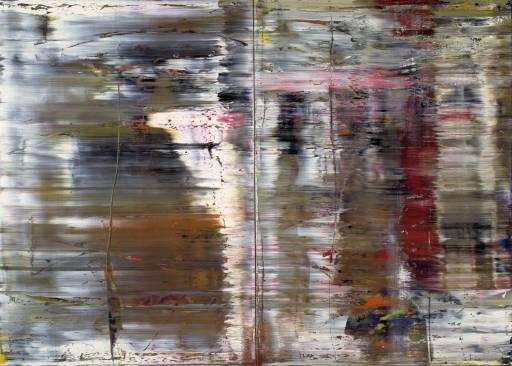
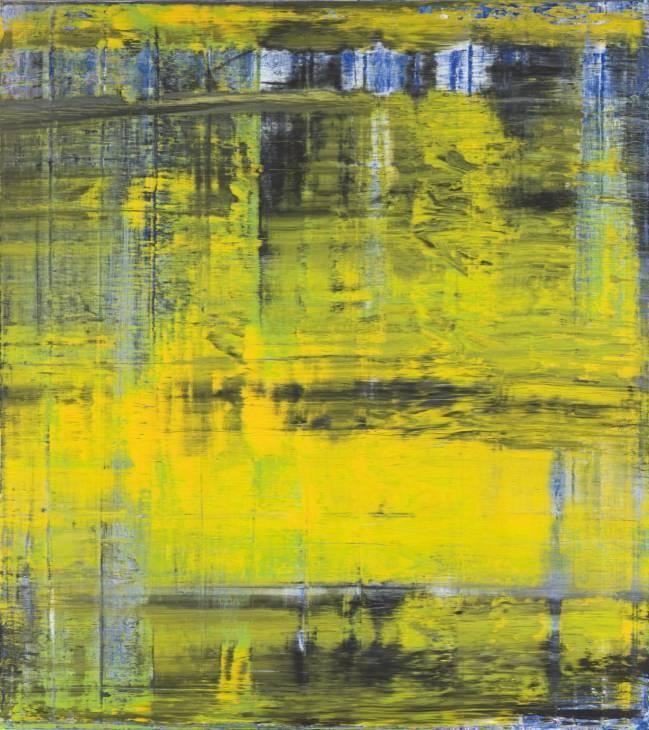
German artist Gerhard Richter is well-known for his abstract works. In the two paintings attached here, he scraped paint across the canvas. Underneath this top layer of paint, Richter sometimes paints a detailed composition, which sometimes peeks through. What do you think about his artwork? How does this artwork make you feel?
In this activity we will scrape the foam off the paper to reveal our artwork!
Let’s get started! You will need:
- Shaving foam
- A baking tray or dish
- Cocktail sticks or wooden skewers
- Washable inks, paint, or food dye
- White paper
- A spatula
- A plastic ruler
Follow the instructions on the attached handout.
Once your paper dries, what can you do with your marbled paper? You could make ribbons or bunting, make decorations or a card. Anything you want.
Please send me a photograph of your marbled paper. If you make something out of your marbled paper, send me a photograph of that, too! (There might be some extra credit points if you do).
Due:
Friendship Bracelet
Friendship Bracelets: https://www.tate.org.uk/kids/make/cut-paste/make-friendship-bracelet
Want to make a friendship bracelet? You make the bracelet by tying lots of small knots. This creates a pattern. The making of friendship bracelets originated in Central America. They were first seen in the US in the early 1970s. According to tradition, the recipient of the bracelet must wear it until the cords wear out and fall off naturally to honor the hard work and love his/her friend put into making it. The weaving and knotting design is a form of macramé, which is a textile-making form using knotting rather than weaving or knitting. Friendship bracelets are special bracelets given from one friend to another as a symbol of friendship. You can have lines, zig-zags and even arrows!
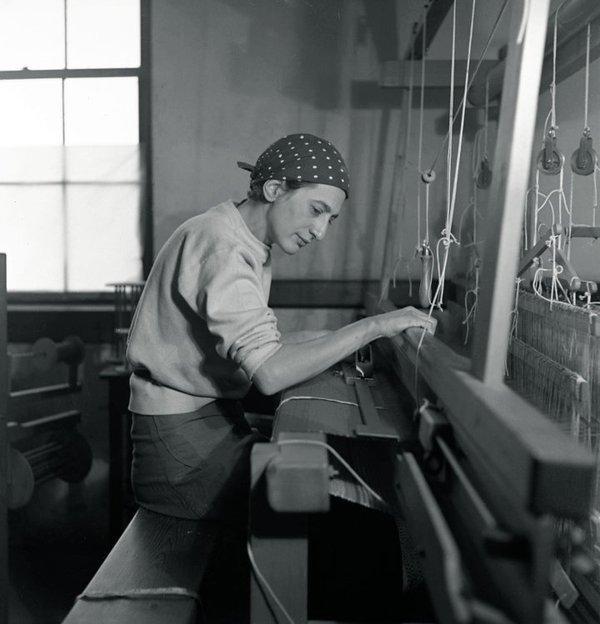
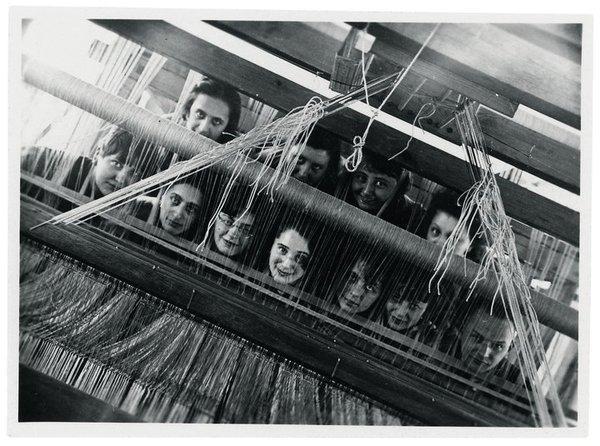
Lots of artists use weaving to create their art. One artist who did a lot of weaving was Anni Albers. Attached are photos of her using a large machine to create big textile patterns. Anni Albers studied weaving and textiles at the Bauhaus art school in Germany. She believed that textiles are a type of art and as important as painting or sculpture! What do you think?
Anni travelled a lot in her life. She spent some time in South America. These trips influenced the patterns and designs of her textiles. Have you travelled somewhere which has inspired you?
You will need:
- 4 different colors of thread (64cm of each)
- Scissors
- Scotch Tape
To make your bracelet, follow the instructions on the attached sheet! Send me a photograph of your bracelet(s) when you are done.
Due:
The Day the Crayons Quit
Read the book, The Day the Crayons Quit by Drew Daywalt: https://youtu.be/jTbINnlW4sI
Just like in the story, your crayons have quit. They no longer want to color the things they normally color. I want you to create a drawing full of exciting animals, fantastic creatures and thrilling adventures…but then I want you to let other colors have the opportunity to color something they normally wouldn’t. You can make the sun purple and the grass orange, if you want. Have fun, but DON’T MAKE ANYTHING THE RIGHT COLOR!
I look forward to seeing how you stretch your IMAGINATIONS!
Due:
CONGRATULATION POSTERS FOR BUDDIES
Due:
Assignment
Climate Machines
This week, we are celebrating Earth Day (Wednesday, April 22nd)! First, let’s read Mercer Mayer’s It’s Earth Day: https://youtu.be/dvQq0Bax9xg
Design your own climate control machine! What could you create to stop global warming? Save the Rain Forests? Protect the Polar Bears? Right now it’s more important than ever to make a positive change in the way we treat our planet. That’s why, to celebrate Earth Day, I want you to design a device that could SAVE THE EARTH!
Here’s how it works:
- Decide what your machine is going to do. What does it need to accomplish to solve this problem? What materials do you need to build it?
- Sketch out your device and PLAN how to build it.
- Build your Environmental Machine using recyclable products – cardboard boxes, plastic bottles, etc. that you have around the house. If you want, decorate your machine with paint or markers.
Finally, share your Environmental Devices by emailing me photos of your sketch and your finished device. Be sure to tell me what problem your device is designed to correct. Happy Inventing!
Due:

Assignment
Today we are starting our SECOND WEEK of exploration of what MAPPING can look like in art-making. Mapping in art-making can be anything from how an artist plans out their work to the process they take to make their work to what the actual finished artwork looks like. Today we are looking at mapping as INSPIRATION. Inspiration is an unconscious burst of creativity in writing, music, or art-making.
Mapping is the act or process of making a map. A MAP is a picture representation of an area of land or sea showing physical features, cities, roads, etc. A map can also be a PLAN. Today we will use WORDS and the VISUAL LANGUAGE of shape, form, color and line to create a composition.
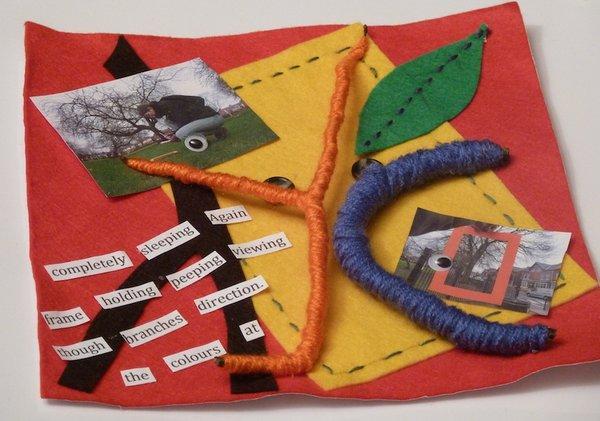
You're going to make a colorful collage. This will be a collage with a difference. You can use paper or fabrics and other things you have gathered to stick down and make your collage, you will also use words. The collage will be a poem you can read and also look at! You will start by gathering your inspiration as well as the fabrics, objects and words to use in your collage. Then you will stick it all together to make your masterpiece!
Process is a series of actions or steps that you take in order to make your artwork. Please adapt this assignment to work with the supplies you have available.
What you need:
- Paper or notepad and pencil
- Pieces of different colored sticky back felt (22.5 x 22.5cm) or construction paper
- Embroidery thread and needle, if you have it (please ask an adult)
- Scissors
- Glue (such as Pritt stick)
- Ruler
- Yarn or string
- Twigs (no bigger than your pieces of felt) and leaves etc
- Buttons, sticky goggle eyes
- Photos of you on your walk or using your viewing frame
Step 1:
To get inspired, take a walk in your local area. This can be around your neighborhood or in a nearby park. You will need to bring a notebook and a pencil or something to write with. Bring your phone or a camera and take some photographs on your walk, too!
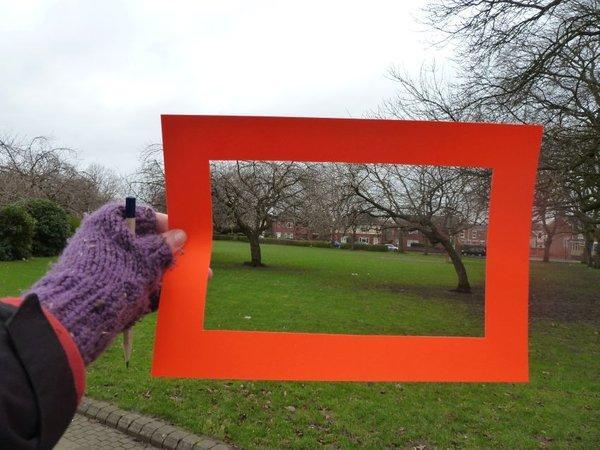
Before you go, make yourself a viewing frame like the one in the attached photograph. It is cut out from a piece of card stock and will help you look at, and focus, on different areas. This viewing frame is helping the artist focus on the trees. If you don’t have card stock, you can cut one out of a piece of cardboard or regular paper (but with paper you will have to use both hands to hold the frame or it will flop around).
Write down some words that describe some of the things you see through your frame. For example I wrote down 'tongue' and 'eye', because on the trunk of one of the trees I thought I saw something that looked just like that.
While you are out, collect things like twigs and leaves to use in your collage.
Step 2:
When you get home look at your words. Make a little story about your walk in the park using your words. Choose your favorite sentence from your story and write that out again. (You can always type it on your computer if you prefer, and print them out).
Cut all the words out from your sentence individually and put them into a bag.
Pick words out from the bag one by one. Put them together to make your poem. Because the words are picked out by chance, your poem will be unexpected and create interesting meanings.
Artists such as Richard Long and Hamish Fulton enjoy walking and often use words from their walks in their artworks. Hamish Fulton’s Wind through the Pines (1985, 1991) is attached. It shows some of the words he collected from a walk. Does it give you an idea of what walking in the woods is like?
Step 3:
Now start to put your collage together. You don't have to follow these instructions exactly...feel free to experiment and have fun making your own designs! If you want to stitch your collage together you can use fabric or felt. If you would rather glue your collage together, use paper!
Select a piece of felt or paper for your background. Then cut a smaller piece of felt or fabric in a contrasting color into a rectangle (About ½ of the size of the background) and stitch or glue this down on the background.
Mark a shape on the rectangle with a pencil. (This can be a rectangle, a square or another shape). Thread your needle (like the mouse in the illustration by Beatrix Potter) and make running stitches along your pencil lines. If not stitching, you can draw a dotted line over your pencil line using a marker or crayon.
On different colored pieces of paper or felt, draw shapes inspired by nature such as a leaf or tree trunk. Cut them out, sew running stitch onto the leaf and then stick them on your collage.
Step 4:
Choose 2 or 3 of the twigs that you collected from your walk and wrap with yarn or string until they are completely covered. Arrange them and sew them onto your collage so they are secure. If gluing, you will need to use Elmer’s or school glue and will need to let this dry completely before continuing to the next step.
Step 5:
Now assemble your cut out words onto your collage using glue. It doesn't matter what order you stick them in. You can stick them next to each other or all over your collage.
If you have photographs from your walk, stick them on too.
Have fun sticking on any extras you may have such as buttons or googly eyes to add extra texture to your collage.
A map is a symbolic representation of selected characteristics of a place, usually drawn on a flat surface. Maps present information about the world in a simple, visual way. They teach about the world by showing sizes and shapes of countries, locations of features, and distances between places. How is your finished artwork like a map?
Email me a photo of your completed collage by Wednesday, April 15th.
Due:


Assignment
Hello Parents and Students! This week we are starting a 3-week exploration of what MAPPING can look like in art making. Mapping in art making can be anything from how an artist plans out their work to the process they take to make their work to what the actual finished artwork looks like. So, today, we are looking at PROCESS. Process is a series of actions or steps that you take in order to make your artwork. Mapping is the act or process of making a map. A MAP is a picture representation of an area of land or sea showing physical features, cities, roads, etc. A map can also be a PLAN.
Jean Arp was a German-French sculptor, painter, and poet, and worked in other media such as torn and pasted paper. Mr. Arp’s artwork resembles the SHAPES and FORMS you see on maps. His process was playful and spontaneous. I’ve attached some of Jean Arp’s artwork here. Have a look at it and think about what you see. Does it look like he is following a plan? What colors does he use? What shapes do you see?
Watch a video tutorial to guide you in making your own Arp-inspired artwork here: https://youtu.be/HdlLy9g6Y_c . Do your best with the supplies you have at home! If you don’t have string and glue, you can use a black crayon or marker. Place the pen on the paper, close your eyes and draw a random line (making sure you stay on the paper). Rotate the paper, place the crayon/marker in a new spot and draw another line. Continue this process until you have enough lines to begin building your artwork.
For this project you will need:
- Paper, card stock or canvas board
- Elmer’s or school Glue
- A Small Plastic Bowl
- String cut to various lengths
- Sharpie or thin black marker
- Various art supplies: crayons, colored pencils, watercolor paint, tempera paint, acrylics, pastels…work with what you have!
Email a photo of your finished artwork to me at [email protected] by Monday, April 6th.