7th Grade Art-2020 - 21 (Period 9 ) Assignments
- Instructors
- Term
- 2019-2020 School Year
- Department
- Art & Music
- Description
-
6th Grade Art meets 9th Period on Wednesday and Friday.
Due to the transition to Distance Learning for the remainder of the school year, please note the following: Due Dates for projects are suggestions to help students keep on track. They are not being enforced, so as long as the work is completed as required and submitted before the end of the quarter, students will receive full credit for their work.
In addition, grading for this class will be assigned on a PASS/FAIL basis. To pass, students must complete at least 2/3rds of the assigned work. My hope is that students would want to complete all the assignments, but we realise that the inherent difficulties of Distance Learning can be a challenge in and of themselves.
If you have questions or concerns about these policies, please do not hesitate to contact me at [email protected]. Thank you!
______________________________________________________________________________________Should you or your student require help with a project, or you have a question that is too involved for email, I would be happy to schedule an "Office Hours" Google Meeting. Please send me an email to notify me of your interest along with a brief summary of the topic/need (so I can be prepared) and a list of three available times (in order of preference). If I am unable to meet during one of the times you have indicated, I will reply with alternatives.
Upcoming Assignments

No upcoming assignments.
Past Assignments
Due:
REMAINING STEAM PUNK PROJECTS
1) Steam Punk Accessory – Using found objects, items around the house, create an accessory that is necessary to operate your Steam Punk vehicle. Is it a glove? Goggles? A crystal cylinder? A telescope? A helmet? A chihkasthsohumdinger? When you submit a photograph of your accessory, include a 2-3 sentence description of what your accessory is and how it is NECESSARY for the operation of your vehicle. Write in complete sentences and double check your punctuation and spelling before submitting your work.
2) Steam Punk Vehicle Build – Make a model of your Steam Punk vehicle using found objects and items around the house. You can build it out of legos, you can incorporate parts from other models, you can sculpt it from modeling clay, or you can build it out of papier mâché. No size requirements, but make it large enough that you can incorporate detail. Paint it. Add decoration. Make sure it looks like your vehicle when you are finished. For example, to create a dirigible, you can paper mâché on top of a balloon, build riggings out of yarn or string and construct the gondola out of cardboard. Send me a photo of your vehicle when it is complete.
3) Steam Punk Writing – Use your vehicle as the inspiration for a short Steam Punk story. Remember to use the characteristics of Steam Punk writing – it should be a blending of Victorian History and style with Futuristic Technology. You story can be action, comedy, horror, romance BUT it has to feature your vehicle in some capacity. Write at least ONE FULL PAGE (preferably more). Include descriptive details, dialogue and make sure to check spelling and punctuation before submitting. Please TYPE the finished paper. Submit on Google Classroom.
Helpful Videos:
How to do Paper Mache: https://youtu.be/TdPkoPwRkZ4
Making a Paper Mache Car: https://youtu.be/bv4SbXyq88Q
Steam Punk videos are still posted on Google Classroom! If you have questions or need help, email me! We can always set up a Google Meet to go over your project if needed.
Due:
Extra Credit: Independent Studies
Due:
Assignment
Final Drawings of Steampunk Vehicles on Prepared Paper
All of the planning and preparation from the last few weeks are now coming together. On the paper you prepared last week, you need to draw the final technical drawing of your steampunk vehicle. On the paper, you need to include:
- A side view of the vehicle
- A front or back view of the vehicle
- A bird's eye view (overhead) of the vehicle
- Some sort of NEATLY written notes that address the purpose and function of your vehicle.
I have indicated a due date of May 4th but this is a guideline to help keep you on track for the remainder of the school year. When you have completed your project, please email a photograph of your work to [email protected].
Due:
Final Steampunk Vehicle Drawing
On the paper, you need to include:
- A side view of the vehicle
- A front or back view of the vehicle
- A bird's eye view (overhead) of the vehicle
- Some sort of NEATLY written notes that address the purpose and function of your vehicle.
DO NOT DRAW DIRECTLY ON YOUR PREPARED PAPER TO START: On a separate sheet of paper (or papers), draw the three required views of your vehicle. Make sure they are large enough to fill the paper but are not so large they will overlap or run off the page.
USE A RULER OR STRAIGHTEDGE for straight lines. Create a precise, detailed drawing. Once they are prepared, TRANSFER the image onto the prepared paper using the GRAPHITE TRANSFER METHOD (this is where you cover the backside of your prepared drawing with pencil graphite. If you set this paper on top of your prepared tea dyed/coffee stained paper and go over the lines, it should reproduce the drawing onto the paper. I recommend taping or weighing it down so it does not shift while you are working).
Once the pencil drawing has been transferred, go over the lines with PEN. You can use a fine point sharpie, Micron, gel pen or ball point. However, if you are using a gel pen or ball point, do not add watercolour or your lines will run.
When writing text, please lightly measure out and draw guidelines before writing. Your handwriting should be neat and legible, and should be placed evenly and consistently on the page. It should not go off at weird angles or arc up or down. If you do not want to draw lines, try taping a piece of lined paper to the back of your artwork and place it in the window. If the paper is not too thick, you should be able to see the lines through the paper - like you are using a light board. Remove the lined paper from the back when you are done!
Once you have finished, you can add shading and interest by painting with tea or coffee. Prepare a cup of STRONG tea or coffee and let it cool (whichever you used to create your paper). Paint parts of your vehicle to add interest or emphasis. If you like, you can use watercolours instead. To allow them to look faded and aged, like the paper, keep your washes thin. Again, if you used a gel-pen or ball point DO NOT ADD THESE TECHNIQUES! I have indicated a due date of May 4th but this is a guideline to help keep you on track for the remainder of the school year.
When you have completed your project, please email a photograph of your work to [email protected].
Due:
Assignment
OPTIONAL WEEKLY MEETING
Starting this week, I will be hosting “Office Hours” on Google Classroom every Tuesday and Thursday from 2 pm to 3 pm. If you have a question about a project, need help understanding a technique or just want to chat about art, email me at least ½ an hour prior to the meeting and I will send you an invitation.
This is not a structured meeting, so when you join the group kindly mute your microphone and sign in under comments with your question. I will work my way down the list in the order of arrival. When we are discussing your reason for coming, then you can turn on your microphone. When we are talking, please make sure your camera is on, too.
If you have questions but cannot attend these sessions and an email would not help, contact me and I will see about setting up an alternate meeting time. Thank you!
Please observe the following rules while attending the meeting:
1) Keep your camera on.
2) Mute your microphone until asked to un-mute.
3) Post questions to comments. I will answer them in the order they are posted. When discussing your question, please unmute so we can converse.
4) Keep conversations and comments on topic. Say hi, wave, etc. at the beginning of the meeting but avoid distracting chatter during the meeting. It makes it very difficult to respond to questions if there is a constant dialogue unfolding in comments that have nothing to do with the meeting content.
5) If you have already have specific questions, please email me in advance so I can be prepared to answer them within the presentation.
Due:
Assignment
Prepare the paper for your final drawing
Select one method of aging your paper you want to use and watch the video –
- Coffee dying: https://youtu.be/c7DmtECcnIA
- Easy Coffee dying: https://youtu.be/0lMinJUM4eo (she talks a lot at the beginning, feel free to skip around to what you need. You can use a hair dryer in place of the heat gun)
- Tea dying: https://youtu.be/1UwZNTLo-Aw - to increase the texture, interest of a tea-dyed paper, you can crinkle up the paper before it goes into the tea, you can wipe a tea bag on top of the wet paper, you can let a wet tea bag drip onto the wet paper (before baking).
Alternatively, if you do not want to tea or coffee dye your paper, you can use brown packing paper. To age the paper down appropriately will require the use of acrylic paint. You can watch the beginning of this video (about making pirate maps) to see how to age the paper: https://youtu.be/jnMbGFKsj3s
IF you are using copy sized-paper you will need three sheets of paper, one for each view…HOWEVER…I would make at least two or three sheets for each view in case you make an error and need to start the drawing over. If you are using a larger sheet of drawing paper that will hold all three views of your vehicle, you can work on a single sheet (but I would still prepare a back up page just in case).
YOU WILL NEED THE HELP (or supervision) OF AN ADULT FOR THIS STEP!
After your paper is stained and DRY, you can tear off the edges of your paper to make the map look older and damaged. With an adult’s help, you can also burn the edges of the paper to make it look like it was pulled out of a burning fire. Keep a damp sponge nearby to put out the fire in case the paper starts to burn too fast! You can even burn a few holes in the paper (But don’t rip and burn so much that you have no paper left to draw your vehicle!) – the pirate map video in the step above demonstrates how to rip and burn the paper if you want guidance. Submit a photo of the paper by next Monday, April 20th.
Due:
Tea-or-Coffee Staining Assignment
Due:
Assignment
Steampunk/Technical Drawings
Now that you’ve practiced some of the technical details of drawing Steam Punk art, on a separate page or piece of paper, you will create a more detailed version of your vehicle. Eventually we want to create a technical drawing of this vehicle, but before we can do that we need to completely realize what our vehicle should look like. A technical drawing visually communicates how something functions or is constructed. Technical drawing is essential for communicating ideas in industry and engineering. Watch this video to get a better understanding of what technical drawing is: https://youtu.be/1Hm5Zyjmjac Our finished work, when we get there, will be more artistic but we still want to understand the style we are attempting to approximate.
Now, return to the sketch of your Steam Punk vehicle you created in your sketchbook before spring break. If you prefer to start from scratch, you may – just remember it needs to be a car, boat, submarine or dirigible. You will eventually need a view of your vehicle from above, the side and the front, but for now just start conceiving of it as a 3-Dimensional object. Add detail! As our goal is to build these, pay attention to how the parts of your vehicle fit together. If you are drawing a car, the standard design is about 3 ½ tire-widths between axels. Identify where the engine would go and provide a space for it in the design. A steam-powered engine would take up more space than an internal combustion engine. What is the scale of your vehicle? How many people is it intended to carry? What is the purpose of your vehicle? Will it transport people or cargo and who will be using it? Where are they going?
- For inspiration, check out the following videos. You are not required to watch them, but if you are having difficulty in coming up with a concept or figuring out how to draw details, these can help:
- Steampunk Vehicles: https://youtu.be/LoToF60HeJc
- STeampunk Machines: https://youtu.be/Y0B0lUU0CLE
- Drawing a bird’s eye view: https://youtu.be/Z0ZeftOUGKk
- Drawing a car in any perspective: https://youtu.be/h7KaFe1rBIc
- How to draw a steampunk airship: https://youtu.be/RDWnkcKFqUQ
- Steampunk Moving Castle: https://youtu.be/UEHCmmxvPyg (timelapse)
- Steampunk War Machine: https://youtu.be/D0d4XpaWukQ (father/son drawing)
Email a photo of your finished artwork to me at [email protected] by Wednesday, April 15th.
Due:
Revised Steampunk Vehicles/Technical Drawing
Due:
Assignment
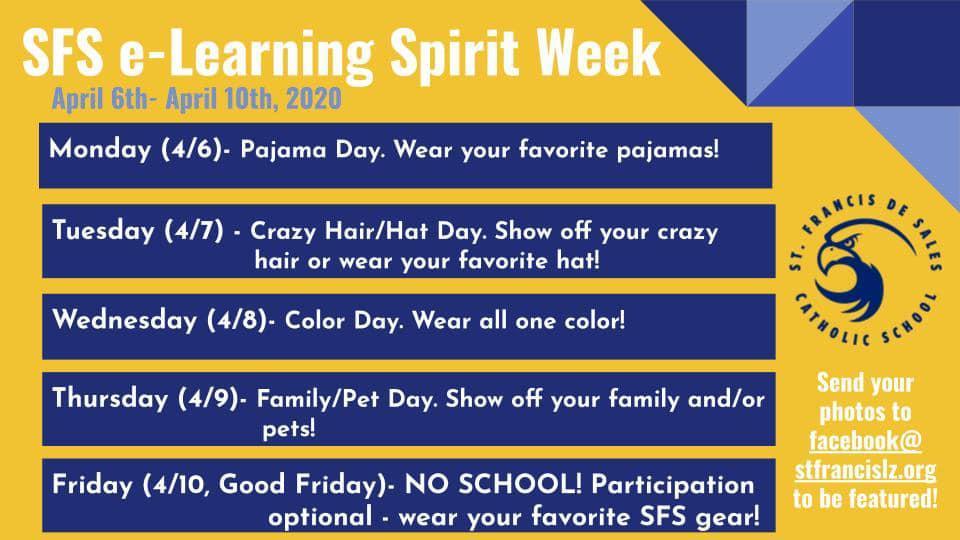
Participate in the Spirit Week festivities next week by dressing in the appropriate theme (see below). Submit a photograph of yourself (dressed accordingly) to the school Facebook page and email me a copy. 5 points for every day you participate, total of 25 possible points. Photograph must be posted and email must be sent on the appropriate day to receive credit.
Due:
Extra Credit Assignment
Due:
Assignment
Steampunk
Before Spring break, you were asked to draw a Steampunk vehicle. We will continue to develop that sketch into a more finished design, but first let’s practice some Steampunk basics in our sketchbook.
1) Draw nuts and bolts: follow along with the video: https://youtu.be/jvntC-rWnGY (39 min video) The demonstration uses a micron pen, but you can use a pencil. Make sure it is sharp! You can do this assignment in your sketchbook. Draw the sample nuts and bolts at the top of the page, then draw a box in the bottom half of the page for the main exercise.
2) Draw gears/clockworks: https://youtu.be/W8KeLnA-C4g watch the timelapse video, then do your best to fill a page with clockworks. Pay attention to how the artist achieves a full range of VALUE (Light and dark). This is how he is able to create depth and dimension to his drawing. He also places a piece of scrap paper under his hand while he works. This helps prevent smudging.
3) Sketchbook Assignment - Draw a Steampunk box: First, draw a cube in 2-point perspective. If you need a reminder how to do this, watch here: https://youtu.be/IXlpsRQDTcI. Your cube should fill most of the sketchbook page. Turn it into a box by adding a lid, then add nuts, bolts and gears to the outside. Shade as needed. I have posted some images of Steampunk boxes on the class stream at Google Classroom for inspiration. If you have not yet joined, the class code is: L6RQBB3.
Please submit your work by email or by posting on Google Classroom by next Monday, April 6th.
Due:
Steampunk Practice
1) Draw nuts and bolts: follow along with the video: https://youtu.be/jvntC-rWnGY (39 min video) The demonstration uses a micron pen, but you can use a pencil. Make sure it is sharp! You can do this assignment in your sketchbook. Draw the sample nuts and bolts at the top of the page, then draw a box in the bottom half of the page for the main exercise.
2) Draw gears/clockworks: https://youtu.be/W8KeLnA-C4g watch the timelapse video, then do your best to fill a page with clockworks. Pay attention to how the artist achieves a full range of VALUE (Light and dark). This is how he is able to create depth and dimension to his drawing. He also places a piece of scrap paper under his hand while he works. This helps prevent smudging.
3) Sketchbook Assignment - Draw a Steampunk box: First, draw a cube in 2-point perspective. If you need a reminder how to do this, watch here: https://youtu.be/IXlpsRQDTcI. Your cube should fill most of the sketchbook page. Turn it into a box by adding a lid, then add nuts, bolts and gears to the outside. Shade as needed.
Submit your work by email or by posting on Google Classroom by next Monday, April 6th.
Due:
Assignment
Due:
Assignment
Due:
Assignment
Due:
Sketchbook
Due:
Assignment
Due:
Art Definition
Your work must be posted here as a google document, not as a comment. If you need help with this process, please ask BEFORE September 27th. Do not email me your response. I will not accept it. At this point, do not worry about commenting on your classmates statements.